Showing posts with label Blush. Show all posts

Tuesday, 5 May 2015

Warm Brown Smokey Eye

Warm Smokey Eye


Hi everyone today I am going to show you how I achieved this warm smokey eye. I love warm brown colours as I feel it makes my blue eyes pop!

Firstly I recommend that when you are doing a dramatic smokey eye that you start off with your eyes. This is in case you have any fall out from your eye shadows and destroy your foundation! Believe me this has happened me more than once.

Step One:

I love to start out any eye look with an eye shadow primer, I use "Mac Prolong Wear Concealer" in "NW20" as this prevents your eye  shadow from creasing and removes the pigment your lids may naturally have. ( For example little pigmented veins)
To set this concealer I used a dusting of "Rimmel Stay Matte" powder in "Translucent".


Step Two:

I then used a large fluffy brush from "Inglot" called the "6ss" to buff in a transition colour to my crease. For this I used "Make Up Geek's" "Peach Smoothie" I cannot recommend this eye shadow enough!

Step Three:

I literally cannot do eye shadow without this technique! I suggest to everyone doing their make up that they apply selotape to the outer corner of your eye to the end of your brow bone.  This helps to give your eye that lovely lifted look.


Step Four:

I then begin to apply my darker eye shadows. My Favourite eye shadow of all time at the moments is "Make Up Geek's" "Cocoa Bear". Its warm toned with a reddish undertone making my eyes pop! I again buff this colour into my crease with a smaller more precise brush for definition. The "Mac 217" is ideal for this, as it blends eye shadows perfectly. However be careful not to blend the eye shadow too far up the cease as it will look a little crazy! I spend at least two minutes blending this eye shadow to remove any harsh lines. 

Step Five:

I then Packed on "Inglot's" eye shadow in "37" onto the lid with my ring finger. I used my finger for this as I feel it packs on the shadow faster than a brush.


Step Six:

I then blended "MUG" "Frappe" into the crease again to help remove any harsh lines from the lids shadow.

Step Seven:

I applied "Rimmel's" Kohl eye-liner in black messily along the lash line, both to the upper and lower lash line, I then used "Real Techniques Accent Brush" to smudge this liner out. I then applied lashings of mascara. I used "Benefits" "They're Real Mascara", don't forget you lower lashes!

Step Eight:

Now repeat all these steps above to your lower lash line! I know lots of people are frightened to wear eye shadow on their lower lash line. But trust me and try it. Just in case you are confused you can now remove the selotape! You should have a lovely lifted eye making your eyes looks bigger and more sultry. 

Step Nine:

I then applied some false lashes I used "Double Trouble" from "Penneys". I like to trim lashes to fit my eye shape, I nearly always trim off the inner corner part of the lash. 

Step Ten:

I then add high lighter to my inner eye corners and my brow bone to brighten the eye. I used "Urban Decay's" eye shadow in "Booty Call". I also packed on "Macs Soft and Gentle" for a little extra inner eye high lighter. Gotta love that glow!!

I hope that you enjoyed reading my Blog! Tweet me any questions you may have.

Love Eleanor x


Friday, 1 May 2015

My Favourite Brushes

My Must have Make Up Brushes for your  Make up Base


Hi everyone!
Today I am Blogging about my favourite brushes for your foundation base. Did you know that a lot of people still apply make up without brushes? I would not be able to cope with out these few trusty brushes of mine!

I think for everyone its a big must to look our best and enhance our natural beauty! Well I find that these brushes have helped me achieve just this!

I will start of with my favourite brushes that I use to apply my base with! 
( like my foundation concealer and powders)


It gives me great confidence when I achieve what I think is a flawless base! Just a tip I always apply my primer or moisturiser with my fingers! As I feel the heat from my hands warms up the products and helps the skin to absorb the product blurring out fine lines and pores.

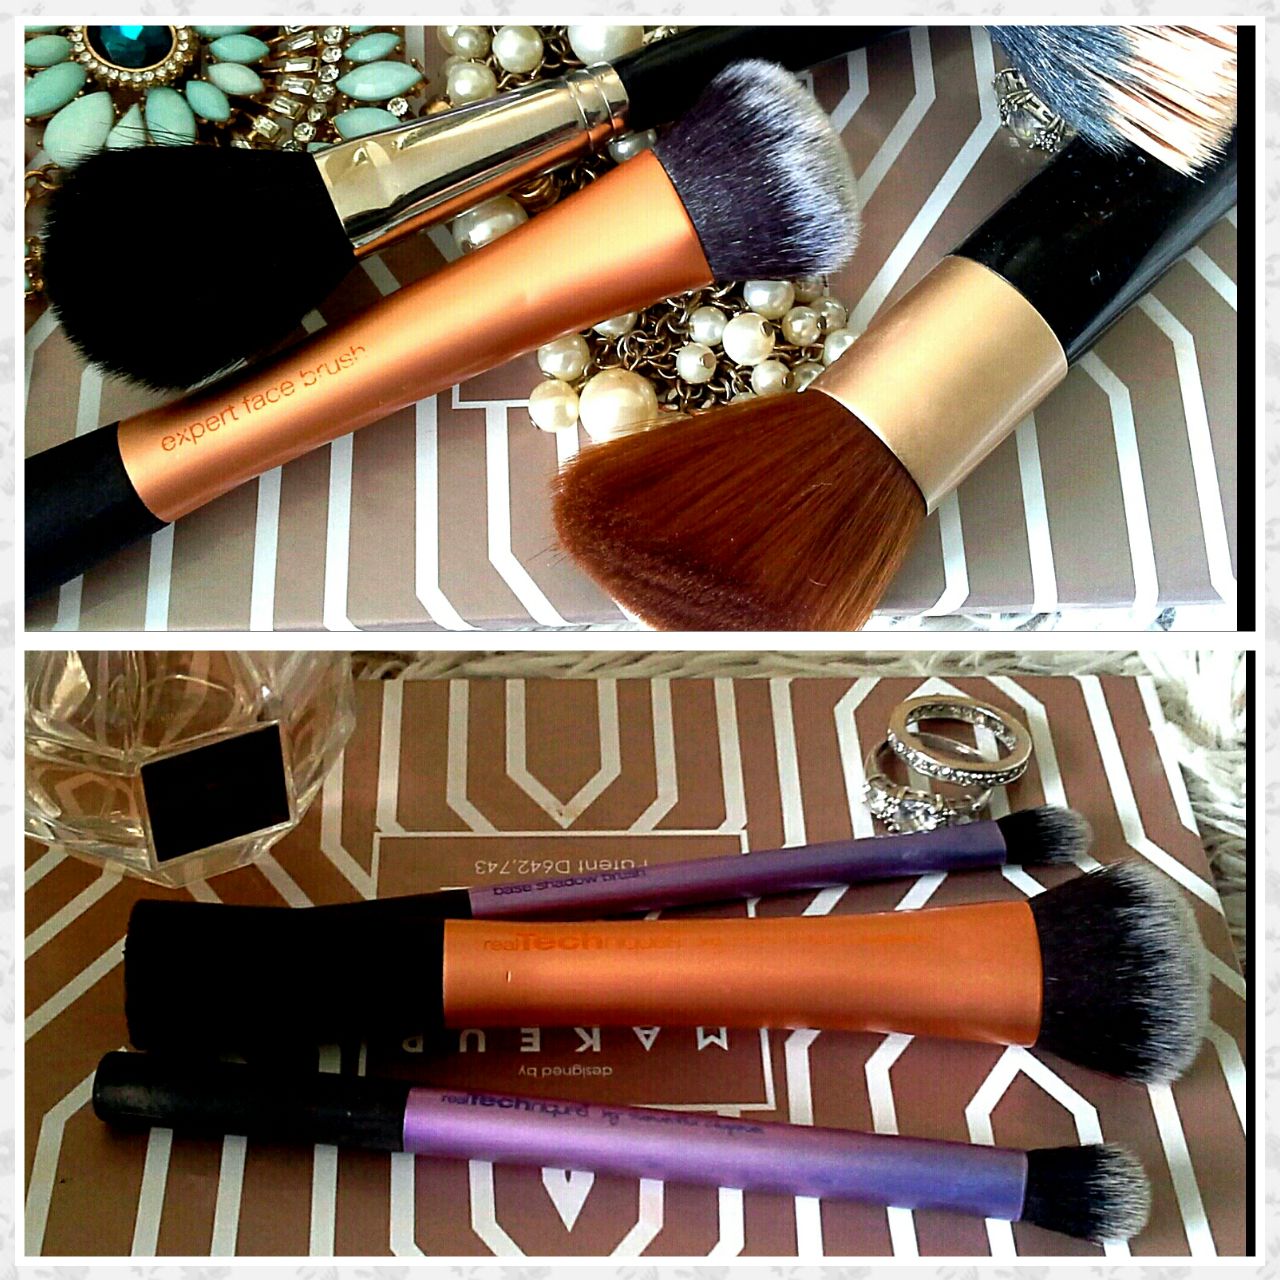
I love to apply my foundation on a daily basis with my "Real Techniques" "Expert face brush". This brush will help you achieve a flawless base. I use this brush in circular buffing motions on the skin and this really blends in the foundation into my skin given a natural look to the skin. This  technique helps to blend away any harsh lines. The brushes bristles are 100% synthetic and unlike natural haired brushes this brush will not soak up your product. Another bonus is that synthetic haired brushes are less likely to shed. Also this amazing quality brush is easy to shop its readily available in a boots near you and is quite inexpensive! This brush retails for about 14 euro, I think this is a bargain as in return you get a flawless foundation application!


After  I have applied my foundation I generally apply concealer, however sometimes I don't bother if I am having a good skin day!
For this application I have two favourite brushes both again from "Real Techniques".
If I am doing glamorous make-up  for a night out I tend to prefer to use the "deluxe crease brush" to apply my under eye concealer. Right now it is really popular to have that Kim Kardashian sculpted look. At times I like to apply my concealer using the technique Kim K made famous. This "deluxe crease brush " is so easy to use and buffs the concealer into your skin effortlessly giving that desired Kim K look. The brush itself is domed shape which makes it so easy to apply concealer into those hard to reach areas. For instance your eyes inner corners where all that unsavoury pigment is. Now with just a flick of this brush it covers up that pigment. Similarly to the "Expert face brush" the bristle are 100% synthetic hair, also for those of you who are concerned these brushes two brushes are cruelty free!!!
If  I am applying concealer to my everyday face make up I like to use a fluffy brush as I feel it blends the concealer in a lot faster. The brush I use is "Real Techniques" "Base shadow brush". I also love this brush for spot concealer as it applies the product accurately and can blend the edges away without disturbing the concealer on the spot. 

After I have allowed my foundation and concealer to set I move onto my powder application. For this I use a brush I have had with years from "Elizabeth Arden". The brush is shaped flat and at an angle and I love this as it presses the powder into your skin at specific locations. I love this as you can build up coverage if you want to or apply a light dusting of powder. I have washed this brush so many times and its still retained its shape and its bristles! So mind your brushes ladies there an investment and will last you years if you mind them!


 After I have applied my powder I will apply my blush and bronzer. For this I use the same brush which I know some people will frown upon! But Heeey you do you Boo! I use the "Inglot 15bjf" this brush is small and fluffy. It is essential that these bristles are soft and are not excessively firm as we do not want to disturb our concealer. This brush is made from natural hair which makes it extra good for blending product and soaking up extra product you may have dabbed onto your skin. I love a natural haired blush/bronzer brush as I love to really blend my blush/bronzer into my base knowing that I wont have any harsh lines left as the bristles will absorb the product.


If I am doing glamorous make-up I love to add in a spot of contouring! For this I like to use a small fluffy brush to help carve out my cheek bones effortless. The "Inglot 6ss" brush does exactly this, avoiding a muddy looking contour. When applying your cheek contour it is so important to blend and blend and blend tirelessly with your "Inglot 6ss" to avoid harsh lines and an un-natural look to the face. This brush will do most of the work for you making your contour a lot easier!

This Brush is so handy to have! Even I need to invest in more of them! The "Inglot 6ss" is incredible at applying your high-lighter for that glow we all love! It literally packs on your high lighter without given you that cake face look! Yaaaaaasssssss!! Just remember that when you have packed on your high-lighter with this brush you must blend away the edges!

I hope you enjoyed reading this Blog! I highly recommend you invest in some of these brushes for your own make-up kit! 

Love Eleanor x