Showing posts with label beauty. Show all posts

Tuesday, 30 June 2015

Gerard Cosmetics | Lipstick | Review

Gerard Cosmetics Review of Lipsticks

http://www.gerardcosmetics.com/


Hi Dolls!
I hope ye are all well? So if any of ye know me I am constantly rabbiting on about how I need to try Gerard Cosmetics Lipsticks.! Eventually after a long time of nagging my boyfriend about these beauties I bit the "bullet" lol and purchased myself five of these lipsticks. When I received these in the mail I was so super excited! The packaging is what drew me to them I absolutely love gold packaging it looks so glamorous! Who does not love feeling glam? I have them displayed on my vanity and they look soo pretty...you need them Dolls. Also there Glam photos on Instagram made me feel like I was missing out!

So lets start this Review then!

Gerard Cosmetics Lipsticks


1995 | I love this lipstick it was developed and formulated by the Queen herself Jaclyn Hill. 1995 is a perfect description of what to expect from this lipstick, its got the whole 90's vibe going on. I love the lip colour that Kylie Jenner has been rocking lately and this lipstick is very similar to what Kylie wears. On my pale skin it looks a mauve colour with a hint of a brown nude I feel so glam rocking this! In my opinion this lipstick is a blend between a creme sheen finish and a matte finish. I feel the need to top this lippy up every few hours as its not matte its staying power is not as good as matte lippies! This lipstick also felt really hydrating on my lips and believe me I have dry lips so this was a plus for me. 1995 is scented and I would describe it as a citrus scent which I love it smells soo gooood!! I am actually smelling it right now....weird I know :) 

Gerard Cosmetics

Buttercup | This name is so sweet omg I love it! This is also formulated by the Queen Jaclyn Hill, she created this lippy first and did an amazing job! This lipstick lives in my handy bag as I love to apply it when I am out and about for a little pick me up! I love pink toned lipsticks and this has everything I love wrapped into one perfect lipstick its a pinky nude with a little sheen to it. It sits smoothly on the lips keeping them lovely and hydrated. The pigment is a sheer pigment so I like to apply a layer then blot then apply another layer to add intensity to the colour. I would love if the pigment was more intense but then it may become a drier formulation so I guess its a win or loose situation. For the days I want my lips to look extra pink I add a pink lip liner all over this improves longevity and pigment!

Gerard Cosmetics Lipsticks

All Dolled Up | Ok I changed my mind this colour is my favourite bright lips are my first love. If I am running late for something and can only spare a few minutes on my face I will add mascara and a bright Lipstick as this will make me look presented and polished...well in my head that's what I think!
I love this lipstick its almost a neon coloured pink its so pretty on and stays put on my lips for hours. It is quite comparable to MAC'S Candy Yum-Yum but in my opinion this lipsticks pigment is better and lasts longer on my Lips. It again has a lovely creamy texture to it and adds moisture to my Lips.

Gerard Cosmetics Lipsticks

Nude | This nude lipstick has a peachy undertone which I like as it adds a little warmth to the Lips that does not completely wash out your face. This is a very pigmented nude shade a little goes a long way. It has more of a matte finish to the Lips so it does not require touch ups! I love wearing this nude Lip on a night out!
Gerard Cosmetics Lipsticks

Kimchi Doll | I feel bad saying this but this lipstick is my least favourite it just does not flatter my pale skin. I seen they hype for this on Instagram and it looked sooo friggen pretty... and I was like I wanaa look like that!? I applied it on and I was like ooh gawd no! The lippy is an intense nude that mutes out any natural pigment in your lips and adds an intense nude colour, it again seems peachy but differs from the Nude shade mentioned above. I just felt that this shade washed out my complexion made me look a little too pale! It is a matte finish which is great for longevity. I am by no means saying that this Lipstick is not good quality it just simply did not suit me and my complexion I am sure it is a fantastic lipstick for other skin shades. The quality of this Lipstick is very good just not a go too for me!

Gerard Cosmetics Lipsticks


Overall I would Rate these Lipsticks 9/10 I only take a mark off as I do which that the Lipsticks lasted a little longer and required fewer touch up! But we cant have it all! I will definitely be adding to my collection again soon as the packaging and range of colours makes my heart weak! :)

Have you tried these Lipsticks? What is your favourite, let me know?

Happy reading!

Love Eleanor x
Tuesday, 23 June 2015

25euro Make Up Challenge | Collaboration |


Hi Dolls!
Today I am trying to do a make up look for €25! I was a little under budget!Boom
This post is in collaboration with my Blogger friends; Helen also known as Grumpylovebeaut,  Amie, Alice and Lisa we all took part in the €25 challenge! Click on their names to see how well they did!
I think I cheated a little :)

I did not include brushes in my challenge fair play to you Dolls that did, I could not do that!?


So the look is an easy simple everyday make up look, maybe its appropriate for work or for a dash around the shops. I loved this look because all the products are affordable making you look a more polished version of yourself! I used very little make up I mainly focused on my base/face but I have to admit I really missed using bronzer and high lighter! This was a struggle not to apply! I missed glowing skin real bad!

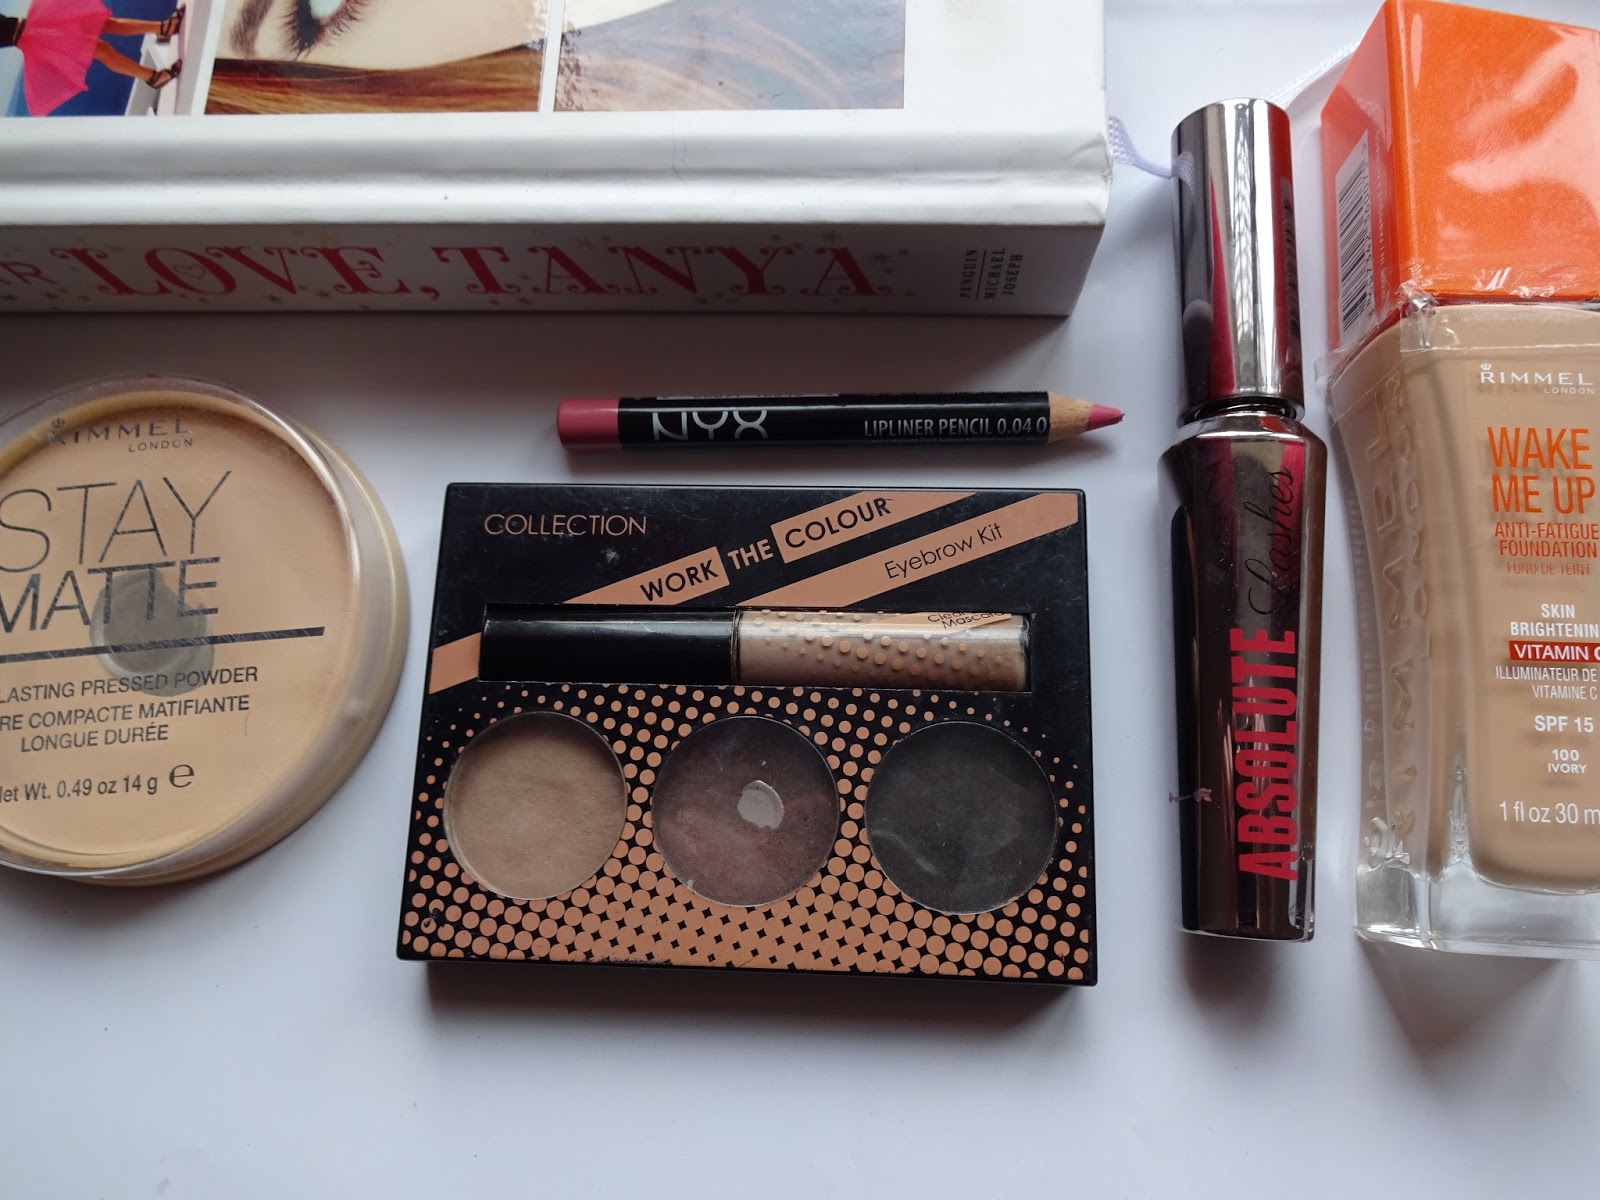
The first thing I did was apply my foundation, can you guess what it is? Thats right Rimmel Wake Me Up in Ivory. I love this stuff and I treated myself to a new bottle from Boots costing €10.99. I love this foundation it gives my skin a luminous glow which helped me feel better as I live for dewy skin. 


I then powdered my skin, I always do this to ensure everything sets in place and stays put during the day. I used my Rimmel Stay Matte Powder in Translucent. This is my favourite powder to use! This was purchased at Boots and costed me €5.99.

Now I have my base complete I already feel more confident. The next step I usually do are my brows. I used my Collection Brow Kit, this is so handy it includes an angled brush and a brow mascara. I love to use my mascara before I apply any brow powder and afterwards to set in place. Today I went for a natural brow that was not overly defined.

At present I have lash extensions on so its advised not wear mascara with them! I did not apply mascara however I did purchase a mascara that I love from Cara priced at €2.00. Its affordable and really lengthens and separates your lashes its a benefit dupe. If you wanted an extra glam look on your eyes you could scoop out some mascara onto a surface and apply it as gel eye liner. It works perfectly trust me. If your nervous about it transferring to your upper lip set the liner with Collection Brow Kit powder the darkest shade. Handy tip for you!

Also you could use the Brow shadows to do a eye shadow look they blend quite well, I was happy with my simple easy make up look.

To finish off this look I went for a pink lip liner from NYX any pink colour will do I used the colour Rose. I slightly over liner my lips for this look. My lips were my focal point. I have this liner a while and it cost me about €4.00. 

NYX lip liner in Rose

I loved this love it took me no length to apply and was so affordable! If I had my way I would love to apply some glow to my skin, but a challenge is a challenge! I hope you enjoyed? Be sure to check out my other Blogger friends too! They did such fabulous looks! I commend ye ladies for not including brushes in your challenges! 

Thanks so much girls for inviting me to be apart of this collaboration!

Thursday, 28 May 2015

Summer Make Up Trend | 2015

Summer Make Up Trend 2015


Hi Dolls!
I hope you are all well? I am certainly looking forward to the Summer! I love when the weather warms up, although this is rare living in Ireland the rain capital of the entire World!! Although we can look forward to the Summers new make up trends.
I think we will all be excited for this as the trend is more natural looking skin with a dewy finish. Hurray! This Summers trend is more about the natural look, showing off those freckles. Bye bye heavy foundation and contour. This Summers trends looks are categorised. The First is the View, Enlightened, Free Party and No Make up.


Look One The View


This look is focused on the eyes and believe me this can  be super dramatic spidery lashes paired with a thin line of eye liner or a dramatic graphic liner for that statement look. These looks are so cool I love them. I never thought in a million years that spidery chaotic lashes would be on trend ever. But guess what? They are.. so time to embrace them. For chaotic lashes its important that between coating your lashes in a voluminous mascara that you allow the layers to dry as this will enable you to make your lashes appear thicker. When you are happy with your lashes thickness and volume its now time to separate your lashes to give that chaotic spidery look. I like to use a clean spoolie. Taddaaahh.... you have achieved the Summers latest beauty trend. I know its not a look for everyday but it would definitely be fun to experiment with!
Summer Make Up Trend 2015 Winged Eye Liner


I love this eye liner on Cara! This is my favourite way to wear winged eye liner its beautiful and brings all your attention to your eyes! Simply elegant.
Summer Make Up Trend 2015 De-constructed Liner

This Summer trend is all about been creative and edgy with your gel  eye liner. This de-constructed liner is not for everyone but I love it. It gives you a dramatic make up look instantly with only one product, I suggest you try out Inglots gel liner in 77 for this look. Also to add more creativity to this look add in the chaotic looking lashes perfect for a festival look. The spidery lashes were inspred by the iconic Twiggy.

Summer Make Up Trend 2015 Thin Eye Liner

Look Two Enlightened

If any of you Dolls know me.. then you know I am all about that  GLOW! I am totally obsessed with glowing radiant skin and yes its on trend for this Summer its all about your luminous and radiant glowing skin. This trend is focused on minimal foundation and pin point concealing. This will suit you ladies that love a quick and easy application of make up. This Summer is less about contoured skin and more about highlighting and making your skin look radiant. Less make up and more au natural looking faces, I love this! I love this idea of more natural looking skin as every Summer I find it a struggle to coverage my freckled ridden face, well this year I am going to embrace and show them off. Glossy lips are also a thing now so layer up your lips the glossier the better!
If you want to know how I achieve Glowing Skin click here


Summer Make Up Trend 2015 Enlightened

Summer Make Up Trend 2015 Enlightened

Summer Make Up Trend 2015 Enlightened 


Look Three Free Party


The Free Party trend is influenced by Bohemian vibes the idea is to look effortless and slightly grungy. This means that the eye shadows can be quickly and easily applied without much attention needed to the shape, the messier the better. This again is great for ladies still trying to improve their eye shadow game! Also this eye look is to be paired with enlightened themed skin, the less foundation and more natural glowing look the better. Basically this trend is all about a better looking you but keeping it simple and natural!However you can also go full on and go for a real graphic eye and dramatic look!

This Free Party vibe is all about a pop of colour too be adventurous make up has no rules, try out coloured gel liners or mad eye shadow colours like Electric blue or Fanta Orange!

Summer Make Up Trend 2015 Pop Of Colour
Summer Make Up Trend 2015 Enlightened Skin and Free Party Eyes

Look Four No Make Up Look

This look is all about the skin and not overloading it with make up products, its focused more around skin care products on the skin and only using small amounts of concealer. The application of concealer is known as pin point concealing a technique where concealer is only applied to the skin strategically. 

Summer Make Up Trend No Make Up Look
Skin is kept radiant looking with a touch of a bronze glow and high lighting. Allow your natural beauty to shine threw embrace your freckles. This Summer trend is still focused on Brows so groom those bad boys!My favourite Brow kit at the moment is the Collection Brow Kit.

Summer Make Up Look No Make Up Look

So what do you Dolls think of this Summers make up trend? Do you love or hate? Whats your favourite look! Mine is the Enlightened trend I love it! 

Thank you for reading my Blog!

Love Eleanor x


* Images From Google

Tuesday, 12 May 2015

Plum Coloured Smoked out Winged Eyeliner

Winged Out Liner Eye Look


Hi everyone!
 So today I am going to posting about how I achieved this Plum coloured eye look with a dramatic winged eye liner!

Please Subscribe  if you like the look!


Step One:

So firstly it is so important that you start off any make up look with a fresh clean base. 
I have got into this new routine of double cleansing! But that post will be for another day! On this occasion I applied my moisturiser from Ponds. I left it then to absorb into the skin whilst I started doing my eye make up.
Its important to let your cream absorb, otherwise it does not plump up your skin, and this means your fine lines and pores are still obvious. 
Just to note that on this occasion I did not use a primer!

Step Two:

I concealed my eye lids with my Mac Pro Long Wear concealer in the shade NW20. This preps my eyes for eye shadow and concealer and pigment I may have on my lid. I also like to set this concealer to stop my lids from creasing. I used Rimmels Stay Matte all day powder in the shade Translucent.

Step Three:

I then applied sellotape to the outer corner of my eyes in an upwards direction. Personally I have hooded eye lids so this helps to open up my eyes! BONUS!

Step Four:

Buff in a transition shade to your crease, I used Make Up Geeks Peach Smoothie.
Take your time on this step and use a fluffy brush like the Inglots6ss.

Step Five:

I then swapped brushes to Mac 217 as it tends to apply eye shadows a little more precisely.
I dipped my brush into Macs eye shadow called Haux. I blended this into my outer crease and blended it back and forth into the crease. Just a tip I always tap off the excess pigment from the brush. 

This photo just shows how your eyes should look!


Step Six:

I then began to add more Plum coloured eye shadows to the look. I applied Macs Sketch eye shadow to the lid. For this I used my finger as it applied more product. I love this eye shadow I think it is perfect for Blue eyes people! After I applied this to my lid you will begin to notice harsh lines back in your crease! 

Step Seven:

Now you need to get a clean Blending brush like a Mac 217. I then Buffed in the Haux eye shadow to my crease again. this should give your eye shadow a gradient look.

Step Eight:

I then added a mix of Honey Lust and Phloof Mac eye shadows to the inner corner to brighten the eye! This added a lovely pop of colour!

Step Nine:

For me the Gel eye liner is the trickiest part! I have defiantly not mastered this skill as of yet!
I used Inglots Gel eye liner in 77 with an angled brush. I took my time and built up the liner. Please do not draw on your liner in one single motion, take it in steps and gradually it will take shape! The sellotape helps to keep both your wings as symmetrical as possible too!


Step Ten:

I now like to apply lashings of mascara! 
If you want you can add falsies but on this occasion  I did not. At this point I like to take a step back look in the mirror make sure everything is blended. Sometimes  I like to add a little more colour to my outer crease. Today I did this and used Sketch to deepen the Plum colour.

Step Eleven:

Remove the sellotape from the eye area. I like a smoked out lower lash line so I then repeat all of the above steps on my lower lash line.

Step Twelve:

I then brushed my eye brows up and filled them in with Rimmels brow pencil. I then set them in place with Collections brow mascara in clear.


Step Thirteen:

I applied my L'oreal foundation in True Match in the shade w4 all over my face with my Expert face brush from Real Techniques.  I then started to high light my face using my Mac Pro Long Wear Concealer again. I applied this along the side of my nose down as far as my nostril and then up towards my temple. It should look like an upside down triangle. I blended this in with my fingers. The heat helps to work the product into the skin. To sculpt my face I used my Rimmel Match Perfection in Natural Beige. This is a few shades darker than my skin so it added a shadow, perfect for contouring! I added this underneath my cheek bones and alone the forehead. This creates depth and dimension.

Step Fourteen:

I now like to set my skin in place, to do this I used my Mac Mineralise Skin Finish in Medium all over my face. However under my eyes I used Rimmels Stay Matte all day powder to keep the under eye bright. To set the contoured areas I used MSF in Medium deep. To enhance my contour I used Nyx's blush in Taupe. To contour my Nose I used Benefits Hello Flawless powder in Beige.


Step Fifteen:

This is my FAVOURITE part of the make up look! 
I apply Macs Soft and Gentle onto the highest points of my face for that GLOW! Yaaass!
And lastly for the lips! I used Inglots Lip Crayon in 14 for that nude lippy! I then used a L'oreal nude lip gloss on top to add that shine!


Thank you all so much for reading this Blog!
I hope you learnt a trick or two!

Love Eleanor x

Friday, 8 May 2015

My Everyday Make Up

Quick and Easy Make Up


Hi everyone! 
Today I am going to show you I created this quick and easy make up look! This is my go to look when I am in a hurry, which lets face it is all the time! This look takes only about ten minutes, and if you hadn't ten minutes I am sure you could leave out a step or two that you feel you don't need.

Step One:

I always like to start my eye make up first, just in case I have fall out from my eye shadows.
I always prime my eye lids to remove any unwanted pigment. Today I used "w7" concealer in the shade "fair". I then set this concealer using a light dusting of "Rimmels" "stay matte all day" powder in the colour "translucent".

Step Two:

I then quickly swirl my eye brush into my bronzer, today I used my bronzer from "Catrice". I applied this all over my lids and blended into my crease. This technique really opens up hooded eyes making you look more awake. I then added "Macs" "Soft and Gentle" to my inner corners and my brow bone to make them pop and to brighten up the area in general. If you have time I would suggest that you then go over your crease again with a fluffy blending brush to blend the high lighter and bronzer in. The brush I used was "Inglots 6ss".


Step Three:

I then curled my eye lashes, this is a step you could skip if you do not have enough time! But for me it helps to open up my eyes. I then apply a voluminous mascara to the both my upper and lower lashes. When the Mascara has dried I applied some of the "Catrice" bronzer to my lower lash line, again you could skip this step.

Step Four:

I then quickly filled in my brows. On a everyday basis I personally do not like over filling in my brows as it can look too harsh. I quickly filled in my brows using a "Rimmel" brow pencil. I also kept brushing out the brows with the spoolie to remove excess product. I do recommend that you add some shape to your brows everyday as they do frame your face. If you are not confident with your brow game try a brow mascara. "Collection" do a brilliant brow mascara and they sell it in a variety of colours.


Step Five:

For my foundation I did not need a lot of coverage as my skin was quite clear. So I mixed my "Rimmel" "wake me up foundation" with a skin illuminator from "L'oreal". This gave my skin a sheer coverage and added luminosity. I also love been able to see my freckles, it makes you look healthy! I dabbed the foundation into my skin using my "Expert face brush" from "Real Techniques", this technique helps to lock the foundation into the skin. 

Step Six:

I then added a touch of concealer under my eyes and down the centre of my nose to conceal any darkness I had. I applied "w7" concealer in the shade "fair" with my clean fingers as the heat from my fingers helped to push the product into my skin flawlessly.


Step Seven:

I then quickly dusted my face with "Rimmels" " stay matte all day" powder in the shade "translucent". After I applied this all over my face I added bronzer for warmth. Today I used "Macs" Mineralize Skin Finish" in the shade "medium deep". I did not use this to contour the face but rather to add warmth so I applied it on my cheek bones the side of my forehead and down my neck. 


Step Eight:

I then added more glow to my skin! I am obsessed with that GLOW! I applied "Macs" "soft and gentle" to the highest point of my cheek bones, down the bridge of my nose, above the arch of my brow and on the cupids bow.

Step Nine:

I then completed this look using a brown coloured lip liner from "Catrice" in the shade "Hey Macadamia a hey". 


Thank you all so much for reading my Blog.

Love Eleanor x


Tuesday, 5 May 2015

Warm Brown Smokey Eye

Warm Smokey Eye


Hi everyone today I am going to show you how I achieved this warm smokey eye. I love warm brown colours as I feel it makes my blue eyes pop!

Firstly I recommend that when you are doing a dramatic smokey eye that you start off with your eyes. This is in case you have any fall out from your eye shadows and destroy your foundation! Believe me this has happened me more than once.

Step One:

I love to start out any eye look with an eye shadow primer, I use "Mac Prolong Wear Concealer" in "NW20" as this prevents your eye  shadow from creasing and removes the pigment your lids may naturally have. ( For example little pigmented veins)
To set this concealer I used a dusting of "Rimmel Stay Matte" powder in "Translucent".


Step Two:

I then used a large fluffy brush from "Inglot" called the "6ss" to buff in a transition colour to my crease. For this I used "Make Up Geek's" "Peach Smoothie" I cannot recommend this eye shadow enough!

Step Three:

I literally cannot do eye shadow without this technique! I suggest to everyone doing their make up that they apply selotape to the outer corner of your eye to the end of your brow bone.  This helps to give your eye that lovely lifted look.


Step Four:

I then begin to apply my darker eye shadows. My Favourite eye shadow of all time at the moments is "Make Up Geek's" "Cocoa Bear". Its warm toned with a reddish undertone making my eyes pop! I again buff this colour into my crease with a smaller more precise brush for definition. The "Mac 217" is ideal for this, as it blends eye shadows perfectly. However be careful not to blend the eye shadow too far up the cease as it will look a little crazy! I spend at least two minutes blending this eye shadow to remove any harsh lines. 

Step Five:

I then Packed on "Inglot's" eye shadow in "37" onto the lid with my ring finger. I used my finger for this as I feel it packs on the shadow faster than a brush.


Step Six:

I then blended "MUG" "Frappe" into the crease again to help remove any harsh lines from the lids shadow.

Step Seven:

I applied "Rimmel's" Kohl eye-liner in black messily along the lash line, both to the upper and lower lash line, I then used "Real Techniques Accent Brush" to smudge this liner out. I then applied lashings of mascara. I used "Benefits" "They're Real Mascara", don't forget you lower lashes!

Step Eight:

Now repeat all these steps above to your lower lash line! I know lots of people are frightened to wear eye shadow on their lower lash line. But trust me and try it. Just in case you are confused you can now remove the selotape! You should have a lovely lifted eye making your eyes looks bigger and more sultry. 

Step Nine:

I then applied some false lashes I used "Double Trouble" from "Penneys". I like to trim lashes to fit my eye shape, I nearly always trim off the inner corner part of the lash. 

Step Ten:

I then add high lighter to my inner eye corners and my brow bone to brighten the eye. I used "Urban Decay's" eye shadow in "Booty Call". I also packed on "Macs Soft and Gentle" for a little extra inner eye high lighter. Gotta love that glow!!

I hope that you enjoyed reading my Blog! Tweet me any questions you may have.

Love Eleanor x


Friday, 1 May 2015

My Favourite Brushes

My Must have Make Up Brushes for your  Make up Base


Hi everyone!
Today I am Blogging about my favourite brushes for your foundation base. Did you know that a lot of people still apply make up without brushes? I would not be able to cope with out these few trusty brushes of mine!

I think for everyone its a big must to look our best and enhance our natural beauty! Well I find that these brushes have helped me achieve just this!

I will start of with my favourite brushes that I use to apply my base with! 
( like my foundation concealer and powders)


It gives me great confidence when I achieve what I think is a flawless base! Just a tip I always apply my primer or moisturiser with my fingers! As I feel the heat from my hands warms up the products and helps the skin to absorb the product blurring out fine lines and pores.

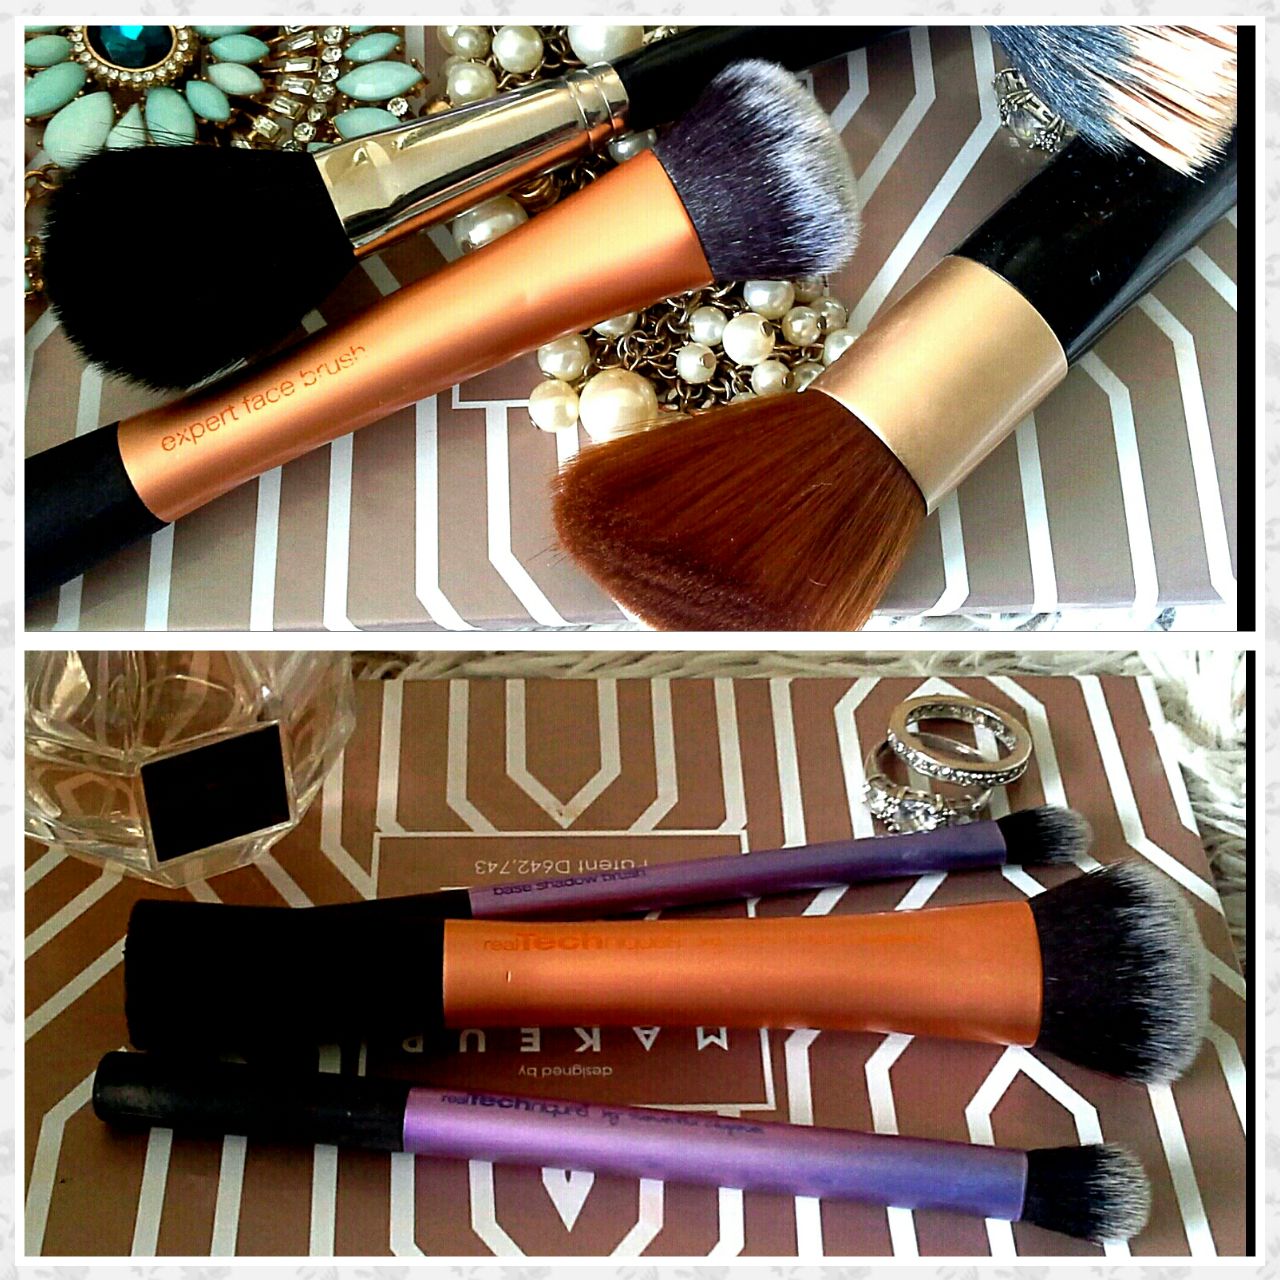
I love to apply my foundation on a daily basis with my "Real Techniques" "Expert face brush". This brush will help you achieve a flawless base. I use this brush in circular buffing motions on the skin and this really blends in the foundation into my skin given a natural look to the skin. This  technique helps to blend away any harsh lines. The brushes bristles are 100% synthetic and unlike natural haired brushes this brush will not soak up your product. Another bonus is that synthetic haired brushes are less likely to shed. Also this amazing quality brush is easy to shop its readily available in a boots near you and is quite inexpensive! This brush retails for about 14 euro, I think this is a bargain as in return you get a flawless foundation application!


After  I have applied my foundation I generally apply concealer, however sometimes I don't bother if I am having a good skin day!
For this application I have two favourite brushes both again from "Real Techniques".
If I am doing glamorous make-up  for a night out I tend to prefer to use the "deluxe crease brush" to apply my under eye concealer. Right now it is really popular to have that Kim Kardashian sculpted look. At times I like to apply my concealer using the technique Kim K made famous. This "deluxe crease brush " is so easy to use and buffs the concealer into your skin effortlessly giving that desired Kim K look. The brush itself is domed shape which makes it so easy to apply concealer into those hard to reach areas. For instance your eyes inner corners where all that unsavoury pigment is. Now with just a flick of this brush it covers up that pigment. Similarly to the "Expert face brush" the bristle are 100% synthetic hair, also for those of you who are concerned these brushes two brushes are cruelty free!!!
If  I am applying concealer to my everyday face make up I like to use a fluffy brush as I feel it blends the concealer in a lot faster. The brush I use is "Real Techniques" "Base shadow brush". I also love this brush for spot concealer as it applies the product accurately and can blend the edges away without disturbing the concealer on the spot. 

After I have allowed my foundation and concealer to set I move onto my powder application. For this I use a brush I have had with years from "Elizabeth Arden". The brush is shaped flat and at an angle and I love this as it presses the powder into your skin at specific locations. I love this as you can build up coverage if you want to or apply a light dusting of powder. I have washed this brush so many times and its still retained its shape and its bristles! So mind your brushes ladies there an investment and will last you years if you mind them!


 After I have applied my powder I will apply my blush and bronzer. For this I use the same brush which I know some people will frown upon! But Heeey you do you Boo! I use the "Inglot 15bjf" this brush is small and fluffy. It is essential that these bristles are soft and are not excessively firm as we do not want to disturb our concealer. This brush is made from natural hair which makes it extra good for blending product and soaking up extra product you may have dabbed onto your skin. I love a natural haired blush/bronzer brush as I love to really blend my blush/bronzer into my base knowing that I wont have any harsh lines left as the bristles will absorb the product.


If I am doing glamorous make-up I love to add in a spot of contouring! For this I like to use a small fluffy brush to help carve out my cheek bones effortless. The "Inglot 6ss" brush does exactly this, avoiding a muddy looking contour. When applying your cheek contour it is so important to blend and blend and blend tirelessly with your "Inglot 6ss" to avoid harsh lines and an un-natural look to the face. This brush will do most of the work for you making your contour a lot easier!

This Brush is so handy to have! Even I need to invest in more of them! The "Inglot 6ss" is incredible at applying your high-lighter for that glow we all love! It literally packs on your high lighter without given you that cake face look! Yaaaaaasssssss!! Just remember that when you have packed on your high-lighter with this brush you must blend away the edges!

I hope you enjoyed reading this Blog! I highly recommend you invest in some of these brushes for your own make-up kit! 

Love Eleanor x


Thursday, 30 April 2015

Fuller Looking Lips

Coral lips


Hi everyone,
today I am posting on how to get fuller lips thanks to Kylie Jenner the world has gone Krazzy for fuller more voluptuous lips. I wore this lipstick recently and loved the creamy finish and fuller look it gave my lips!


The products I used to achieve this fuller lip were; "Max Factors" lipstick in the shade "Bewitching Coral" and "Catrice" lip liner in the shade "Red Lip District". However in my opinion both products were a coral shade not a red shade unlike the liners naming. 

Firstly,
I ensured that my lips were clean and had no foundation residue on them and that they were not dry. If your lips are dry I suggest you try exfoliating them on a regular basis. What I do which I know sounds crazy is I  keep a clean spare tooth brush and in the mornings I use the tooth brush over my lips moving it in circular motions. This removes dead skin and promotes circulation, this in turn enhances your lips fullness for a period of time. Win Win rigghhtt?! Once your lips are smooth its a good idea to apply a thin layer of lip balm and allow it to soak into your lips. I recommend the "Burts Bees" lip balms as they are very moisturising.

Now the fun part! When your lips are all prepared I suggest that you over draw your lips, however please do not over draw them completely or you could end up looking like a duck! But in saying that you do you boo! Ensure that your liner is sharp. I like to start lining my lips at my cupids bow this is where I over draw my lips the most. I begin by  over drawing the top of my cupids bow a few mm more than where my natural lip line ends. This enhances the shape of my lips. When I am happy with the cupid bow shape I like to pat the liner and blend it into my lips. This removes excess product and works it well into the lip given it a more natural look. After I have done this I will reline my lips the same way all over again this time filling in all of the lips with the lip pencil. The next place I personally prefer to over draw my lips in the fullest part of my lower lip not the edges. I again use the same technique. I draw my lips a little fuller where it is naturally fuller and blend the liner in again as this also increases longevity of the lip look.


Now
 that you have lined your lips its time for your lipstick. 
I personally like applying lip stick from the bullet. I am lazy to apply with a brush!! I like to apply a thin layer then smack my lips together. I then will grab a tissue and split the tissue in half. I then gently touch this off my lips and press my lips against the tissue, again this removes excess product and works the lipstick into the lips. After I have done this I will then apply another coat of lipstick. At this stage some people like to apply the tissue to their lips again and dust a light layer of translucent powder onto the tissue, This is to set the lipstick and improve its staying power however I rarely remember to do this! I love to apply a dab of a high lighter on to my cupids bow to finish off the lips I love to use "Macs soft and Gentle" high lighter. This will help pull out your lips and again make them look fuller. Light pulls things forward and dark shades push things back! you get the idea its all about creating the illusion of fuller lips!

This is the end result of all my lippy work!


Generally speaking if you would like to have bigger and fuller looking lips you may be better of using a matte lipstick! But I am so into coral shades right now that I just wanted to share this look with you all.

I hope you enjoyed reading my Blog!

Love Eleanor x