Showing posts with label Drug store. Show all posts

Tuesday, 5 May 2015

Warm Brown Smokey Eye

Warm Smokey Eye


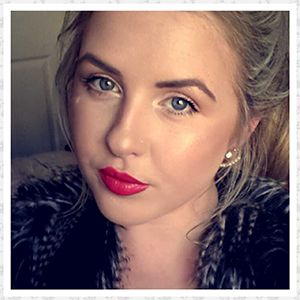
Hi everyone today I am going to show you how I achieved this warm smokey eye. I love warm brown colours as I feel it makes my blue eyes pop!

Firstly I recommend that when you are doing a dramatic smokey eye that you start off with your eyes. This is in case you have any fall out from your eye shadows and destroy your foundation! Believe me this has happened me more than once.

Step One:

I love to start out any eye look with an eye shadow primer, I use "Mac Prolong Wear Concealer" in "NW20" as this prevents your eye  shadow from creasing and removes the pigment your lids may naturally have. ( For example little pigmented veins)
To set this concealer I used a dusting of "Rimmel Stay Matte" powder in "Translucent".


Step Two:

I then used a large fluffy brush from "Inglot" called the "6ss" to buff in a transition colour to my crease. For this I used "Make Up Geek's" "Peach Smoothie" I cannot recommend this eye shadow enough!

Step Three:

I literally cannot do eye shadow without this technique! I suggest to everyone doing their make up that they apply selotape to the outer corner of your eye to the end of your brow bone.  This helps to give your eye that lovely lifted look.


Step Four:

I then begin to apply my darker eye shadows. My Favourite eye shadow of all time at the moments is "Make Up Geek's" "Cocoa Bear". Its warm toned with a reddish undertone making my eyes pop! I again buff this colour into my crease with a smaller more precise brush for definition. The "Mac 217" is ideal for this, as it blends eye shadows perfectly. However be careful not to blend the eye shadow too far up the cease as it will look a little crazy! I spend at least two minutes blending this eye shadow to remove any harsh lines. 

Step Five:

I then Packed on "Inglot's" eye shadow in "37" onto the lid with my ring finger. I used my finger for this as I feel it packs on the shadow faster than a brush.


Step Six:

I then blended "MUG" "Frappe" into the crease again to help remove any harsh lines from the lids shadow.

Step Seven:

I applied "Rimmel's" Kohl eye-liner in black messily along the lash line, both to the upper and lower lash line, I then used "Real Techniques Accent Brush" to smudge this liner out. I then applied lashings of mascara. I used "Benefits" "They're Real Mascara", don't forget you lower lashes!

Step Eight:

Now repeat all these steps above to your lower lash line! I know lots of people are frightened to wear eye shadow on their lower lash line. But trust me and try it. Just in case you are confused you can now remove the selotape! You should have a lovely lifted eye making your eyes looks bigger and more sultry. 

Step Nine:

I then applied some false lashes I used "Double Trouble" from "Penneys". I like to trim lashes to fit my eye shape, I nearly always trim off the inner corner part of the lash. 

Step Ten:

I then add high lighter to my inner eye corners and my brow bone to brighten the eye. I used "Urban Decay's" eye shadow in "Booty Call". I also packed on "Macs Soft and Gentle" for a little extra inner eye high lighter. Gotta love that glow!!

I hope that you enjoyed reading my Blog! Tweet me any questions you may have.

Love Eleanor x


Thursday, 30 April 2015

Fuller Looking Lips

Coral lips


Hi everyone,
today I am posting on how to get fuller lips thanks to Kylie Jenner the world has gone Krazzy for fuller more voluptuous lips. I wore this lipstick recently and loved the creamy finish and fuller look it gave my lips!


The products I used to achieve this fuller lip were; "Max Factors" lipstick in the shade "Bewitching Coral" and "Catrice" lip liner in the shade "Red Lip District". However in my opinion both products were a coral shade not a red shade unlike the liners naming. 


Firstly,
I ensured that my lips were clean and had no foundation residue on them and that they were not dry. If your lips are dry I suggest you try exfoliating them on a regular basis. What I do which I know sounds crazy is I  keep a clean spare tooth brush and in the mornings I use the tooth brush over my lips moving it in circular motions. This removes dead skin and promotes circulation, this in turn enhances your lips fullness for a period of time. Win Win rigghhtt?! Once your lips are smooth its a good idea to apply a thin layer of lip balm and allow it to soak into your lips. I recommend the "Burts Bees" lip balms as they are very moisturising.

Now the fun part! When your lips are all prepared I suggest that you over draw your lips, however please do not over draw them completely or you could end up looking like a duck! But in saying that you do you boo! Ensure that your liner is sharp. I like to start lining my lips at my cupids bow this is where I over draw my lips the most. I begin by  over drawing the top of my cupids bow a few mm more than where my natural lip line ends. This enhances the shape of my lips. When I am happy with the cupid bow shape I like to pat the liner and blend it into my lips. This removes excess product and works it well into the lip given it a more natural look. After I have done this I will reline my lips the same way all over again this time filling in all of the lips with the lip pencil. The next place I personally prefer to over draw my lips in the fullest part of my lower lip not the edges. I again use the same technique. I draw my lips a little fuller where it is naturally fuller and blend the liner in again as this also increases longevity of the lip look.


Now
 that you have lined your lips its time for your lipstick. 
I personally like applying lip stick from the bullet. I am lazy to apply with a brush!! I like to apply a thin layer then smack my lips together. I then will grab a tissue and split the tissue in half. I then gently touch this off my lips and press my lips against the tissue, again this removes excess product and works the lipstick into the lips. After I have done this I will then apply another coat of lipstick. At this stage some people like to apply the tissue to their lips again and dust a light layer of translucent powder onto the tissue, This is to set the lipstick and improve its staying power however I rarely remember to do this! I love to apply a dab of a high lighter on to my cupids bow to finish off the lips I love to use "Macs soft and Gentle" high lighter. This will help pull out your lips and again make them look fuller. Light pulls things forward and dark shades push things back! you get the idea its all about creating the illusion of fuller lips!

This is the end result of all my lippy work!


Generally speaking if you would like to have bigger and fuller looking lips you may be better of using a matte lipstick! But I am so into coral shades right now that I just wanted to share this look with you all.

I hope you enjoyed reading my Blog!

Love Eleanor x