Monday 6 June 2016

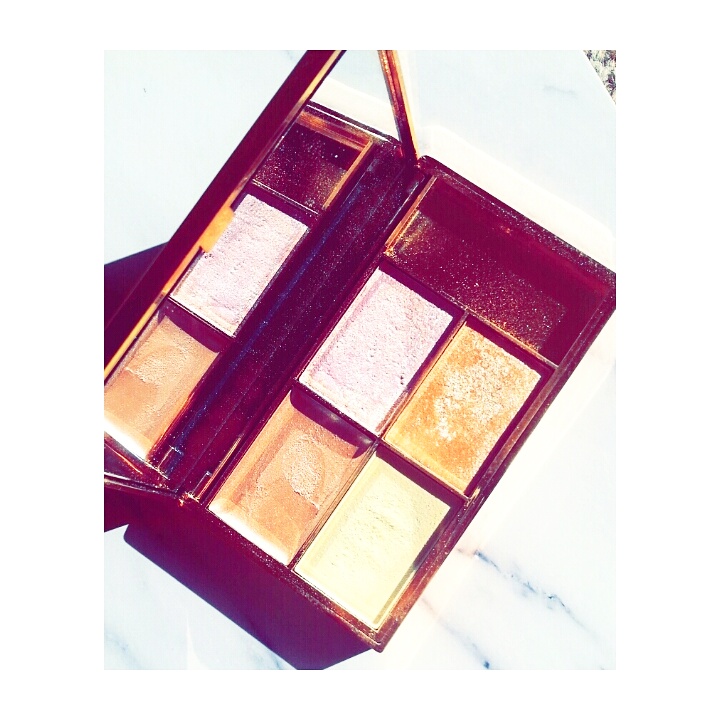
Why you need this high lighter! | Sleek Solstice High Lighter

Hi Dolls! 
I know my Insta feed has been full of endless selfies of me wearing the Sleek Solstice high lighter palette. The reason why? It is just amazing and can probably seen from outer space!! I am NOT kidding.... it gives the most intense glow!!

I bought my sister this high lighter as a Christmas present, I just thought the packaging was cute! I had not heard much about the product itself! I have never been so wrong about a product! I kept complimenting her glow and every time she would repeat its the sleek palette! I eventually I ordered it and fell in love for myself.


I love all of these high lighters, but I do have my favourite.  I personally love the gold high lighter it suits my pale skin the most, the yellowy high lighter makes my skin look a little dull but looks  lovely when I have a tan. There is a cream high lighter too that I love to use on my décolletage across the collar bones it gives my skin a lovely radiant luminous glow! If you are more daring than I am the lilac high lighter is so cool, I would most defiantly wear it at a festival for a retro glow, I mean who would not like a lilac glow from their face?? So super pretty!

Another plus for this is the packaging I love the gold packaging!! Its so pretty and elegant! There is also a F A B U L O US  mirror in the palette that I love to use for doing my make up.It is so good and really clear, sometimes I pop it into my bag and use it for touch ups.

Just look at that  G L O W!! Its by far the most intense glow I have ever used and it is so affordable! I still love my Mac soft and gentle high lighter for a subtle glow, but now I am living for an intense mind blowing glow!

So please run along to your nearest Boots and buy this bad boy you wont be disappointed!!

Thank Dolls for reading!
Let me know if you love this too...or what is your go to high lighter?
Love Eleanor x

Saturday 21 May 2016

Electric Eye Look | Guest Blogger


Hey everyone!

Eleanor kindly let me do a guest post, so I thought it'd be a nice idea to do something colourful and fun. Hope y'all like it. The main element in this look is the eyes, its from one of my favourite palettes- the electric palette by urban decay.

So for this I just did my routine as normal. I primed my face with fix and protect by Rimmel, the foundation was Revlon colorstay in the shade 200 nude. (This is a brilliant dupe for double wear and it's only about half the price ).


I drew on my brows using the Archery D.I.Y brow bar by Soap and Glory. This is a a super handy brow palette as it has two shades you can mix to get the perfect match to your brows and it includes a highlighter!

Now on to my favourite part the eyes!
I primed them using urban decay eye shadow primer potion in the shade minor sin. For me this is eye make up holy grail!! It is such a nice tone and keeps the eye shadow perfectly. This is really good for a look with such pigmented colours such as this palette, so that they don't look dulled. On the lid I smudged on nyx jumbo eye pencil in 608 Cottage Cheese. This will add serious intensity to the colour on the lid.

In the crease, from outer to inner, blend the colour savage. With a different brush, just slightly lower blend the colour urban, this is a super cool purple for the summer months. I think it'd be awesome for a festival look. On the lid with a clean brush, pat on the colour fringe and blend out lightly. Under the eye with a thin brush line the eye with the colour streak. Just for a pop of something against the purple. Then line with the urban decay liquid liner (one of my favourite must have's) and a lick of mascara.

 To bring the look to more of a going out look I just popped some urban decay liquid glitter in the gold shade on top. Just pat it on with the brush and wait 30 secs to dry. Adding some serious glam to any eye look.

To contour I just used the Blank Canvas palette, it's super handy as it has all the necessary shades and stays on perfectly. Its a bargain at around €15, but it lasts ages! Its available on their website! To finish just add a spritz of the urban decay setting spray it will keep your face in place all night !

Hope you like the look :)

Thanks for having me!
Tri x


For more info check me out on!!
Instagram: wexcat
Facebook: https://www.facebook.com/dragonflybeautyblog/

Saturday 14 May 2016

What I got for my Birthday!


Hi Dolls!
I thought that ye all might like to have a quick snap shot into what I got for my birthday! This birthday was more special than your average birthday as it was my first birthday been a Mommy to my gorgeous baby boy Freddie! I turned 24 ...and boy did I get spoiled! lucky me!


How gorgeous are these Michael Kors earrings? I am obsessed with them in fact  I love them so much I do not know if I should wear them or not...? I know right... I must be crazy? They deserve to be seen! These earrings are such a beautiful gift not only are they elegant with their simple chic design they kinda match my rose gold Michael Kors watch! Winner! They are a match made in heaven! I am so grateful for these beauties thanks to my Nana V who treated me to them, she always knows how to spoil me!


My next prezzie was gifted to me by my handsome little boy, who I must say has excellent taste! How cute is he for remembering his Mommys birthday?? 

Can you guess what he surprised his Mommy with?


I love this so much I love the pastel colour and the simple diamond clasp! The inside of the purse is a blush pink too, it is just oooh soo super pretty! I love it I immediately started using it! I give it a big thumbs up for versatility, what I mean is that  I am normally addicted to purses that look pretty and are fashionable....but maybe just maybe they are not the most practical! Sometimes they only fit in large handbags which as you know is annoying if you want to rock a little black dress and a clutch! But this purse ticks all those boxes, small enough to fit into clutches, designed that it has enough space to hold multiple cards to compartments to hold you wads of cash, and plenty of space for loose change! Thanks Freddie and your daddy who helped spoil me, I hope you remember my birthday next year too!?

I am a firm believer that for your Birthday or Christmas you should always gift yourself something! This year I had not a clue what to buy myself...and then I walked into these bad boy!


I think I was channelling my inner Kendall Jenner! I just wish I had the body to match! Honestly though how amazing are these? I am going to feel boss wearing these! These are my first ever designer undies..I could yet become addicted? Will have to wait and see!

I was also gifted these stunning Lacoste sunglasses! I love the vibrant colour normally my sunglasses are the classic brown or black frames. But with these I am so excited to step outside my comfort zone and wear bright pink frames. I love the shape its so pretty!


Side View pic below! But seriously they look awesome on and are so comfy and best of all they leave no dent around my nose which always blotches off my foundation! 


Something that arrived for my birthday  that I had ordered was this cute coffee mug from My Shining Armour.


At first I was not sure should I use this as a pretty brush holder on my vanity or should I sip my coffee from this posh mug? Honestly it was such a dilemma! Hehe! What did I choose?? Well I decided to sip my coffee from it! I love it I feel so elegant drinking from gold polka dotted mug stamped with my initials! You should all treat yourselves to one! C'est tres chic!!!


On my actual birthday I had a birthday lunch where I indulged myself! It was oh so yummy and so lovely! This year I felt so blessed for my little family and all my friends and family! I was truely spoiled! 

Just a note there in nothing nicer than a chilled vino to a new mommy! believe me I really enjoyed this! Its the little things... oooh almost forgot I devoured all of this bad boy too!!


How yummy does this Meringue look topped with beautiful fresh fruit and ice cream! As I am writing this my mouth is watering.. I need another one!? Y U M M Y !! 

To top it all off I had a birthday weekend too  gifted to me by my Mom in a fabulous hotel in Satlhill and an amazing Spa day in the G hotel from my boyfriend! This was absolutely amazing! I totally needed a break to chill and unwind!

I was gifted lots of things this year thank you to all! I hope you enjoyed this post!

Thank you for reading!

Love Eleanor x x 

Thursday 28 April 2016

My new go to Concealer! Nars Radiant Concealer.

Nars Radiant Concealer

Hi Dolls! 
So a while ago my local Brown Thomas in Limerick got its own Nars counter! I was super duper excited as I had read tonnes of amazing reviews about their new concealer. Am I a fan you ask??
                                                             "OMG YEEEESSSS".

Nars Radiant Concealer is the bomb! Once I had gathered a few cents together I splurged on this goodie! Where do I start..? Firstly I use the shade Chantilly, as I am super pale and wanted an everyday concealer. |If you are tanned or looking for a concealer for night time, I would suggest trying the shade Custard. My old favourite concealer was Mac ProLongWear concealer I thought at the time that it was amazing, but not so much now! I have very dry under eyes and the Mac concealer used to settle into my fine lines and felt a little sticky. Unlike the Mac Concealer this concealer buffs into the skin giving very buildable coverage.

Nars Radiant Concealer


The applicator dispenses product slowly so you can build up coverage and work into the skin. I always found Mac ProLongWear concealer blobbed out way too much product..more than I would ever need!

Nars Radiant Concealer


Tips on how to apply your concealer flawlessly! I love to use a buffing fluffy brush for applying this. I love the Penneys fluffy dual ended synthetic haired brush. I apply my concealer in layers to avoid a cakey build up. A great too know, is that when you use synthetic haired brushes the bristles absorb excess product which again helps avoid cakey looking under eyes! I start off by applying a sheer layer I then go back and add more coverage where is needed. This concealers applicator is great for this. The formula of this concealer is great for dry skin its smooth and blends so well! I would not say its hydrating but it is not drying in my opinion. I love how well it blends as it hides fine lines giving a luminous finish. Woohoo!

Penneys Make Up Brushes

When I am applying concealer I do not apply it in dots under my eyes as this makes the product harder to blend out. I prefer to apply in streaks, literally streaks under my eyes in a triangle shape.
This technique disperses product more evenly around the skin. I always try to avoid applying too much concealer directly under the eye as I have lots of fine lines here.I have to say this concealer does not crease as it has a silky texture to the formula. I find the best way to blend in the concealer into your foundation is by using your finger to tap out the edges, avoiding harsh lines.

Nars Radiant Concealer

Another thing I love is the Packaging! Its so sleek and screams sophistication! Its compact and so easy to pop into your handbag for touch ups etc. I love all of Nars's packaging! Glam Glam!

For more tips and tricks on concealers and concealing tips and tricks be sure to click here.

Thanks for reading Dolls.

 Love Eleanor x 


Shop this concealer here! 
Go on treat yourself..its worth it!

Tuesday 26 April 2016

My Favourite Nude Lip Combo!

Fuller Looking Lip Cheats

Hi Dolls! 
Today I want to tell you all about my favourite Lip combo, I am obsessed with how it looks!
Do you like it? 

I just love how plump the lip liner "Oh Honey" from Macs Pro Longwear lip liner range makes my lips look. I always over line my Lips. Sometimes  I like that extra plump look so I round off my cupids bow...this look is not for everyone but I think it gives me the ultimate pout! I love how full and amazing Kylie Jenners lips are.....but for a fraction of the price and no pain! I use this lip liner all over my lips and then fill in the lips with a fab nude lippy from Mac called "Yash"! You actually need this lippy in your collection its the perfect pinky brown nude and makes my lips pop! Go on treat yourself, we all need a go to nude lippy as its so versatile! Any-ways back to the mini review, its so creamy for a matte lippy and does not feel dry on your lips or settle into your lip lines. Its also the perfect nude for my pale skin.Winning!

Fuller Lips
Fuller Looking Lip Cheats

 As I said I love full lips and love to cheat this and give myself full lips minus the surgery... to amp the fullness I add a gloss to the cupids bow and the bottom of the lower lip.( Not all over the Lips). This draws light into the lips and creates the illusion of a fuller more kissable juicy lip!! My favourite gloss at the moment is from Max factor and its called ""Pristine Nude"".


I hope you dolls like this Blog about my favourite Nude Lip combo! I hope you liked the tips...have you any for me? What are your full lip cheats?? I am forever searching for new ways to create a fuller pout!! Thanks for reading!
Love Eleanor x

Shop The Look:
Mac Lip Liner: "Oh Honey"
Mac Matte Lipstick: "Yash"
Max Factor Lip Gloss: "Pristine Nude"

Wednesday 23 September 2015

Easy Glam Autumnal Smokey Eye


Hi Dolls!
 I hope you are all good!? The Autumn months are actually my favourite months of the year! I love the idea of snuggling up on the couch and having a candle lit and a big fire on, I really love it! So in saying all this, this is what inspired me to create this smokey eye for you Dolls!


So I wanted to keep this look simple with only a few steps and products. I started off by priming my eye lids with Rimmels Wake Me Up concealer in light. I applied Illamasqua Liquid Metal in the colour Solstice to intense the gold eye shadow I wanted to use. I applied this to the mobile lid with my ring finger. I then applied the shadow half baked from my Naked Two Palette Half Baked with my ring finger also. This intensified the colour pay off!


I then buffed out the edges with my holy grail eye shadow from Make Up Geek Peach Smoothie. This helps to buff out the edges and removes harsh lines. I then buffed in Cocoa Bear into my crease and outer corner. I added the shadow in small amounts, this was to avoid my eyes looking harsh and unblended. 

A good tip when applying your crease shade is to keep your eyes open so you can see your shadow placement and ensure it looks well blended. I love to use my Inglot 6ss to diffuse any harsh lines.


I used BootyCall to highlight my brow bone and the tops of my cheek  bones. I also buffed a little Cocoa Bear under my lower lash line to tie the whole eye together.


I find the Naked Twos eye shadows to be very versatile, today I used the Naked palette to fill in my brows I used the shade Tease with a Real Techniques angled brush. I finished off my brows my applying Maybelline's Brow mascara to keep the hairs in place all day.


Today I wanted to sculpt my face, so I applied my Stilla concealer in dark around the outer perimeters of my face and applied my Rimmel concealer under my eyes down the bridge of my nose. I then buffed out the edges with my Real Techniques Expert face brush and my Rimmel Wake Me Up foundation. I used a stippling motion.


I made sure to blend in all the products really well so there were no harsh lines or muddy areas. Sometimes the blending process can take a little while!


To set all my foundation I applied my Mac Miniralise Skin Finish in Medium all over my face, especially my under eyes to help prevent creasing. I then used my Medium Deep MSF to warm up my face and to contour subtly.


So this was the finished look :) I hope you Dolls like it? Its quick and easy and not too intense, I would wear this day or night. Where would you wear this look? Tweet me your recreations!

Thanks so much for reading!
Love Eleanor xx

Thursday 27 August 2015

| The Products you need for going back to School! |


Hi Dolls!!
How are you all? I am sorry for my absence I have been so busy! I hope to get back into the swing of things again soon! So unfortunately I am not young enough any more to be going back to school :) But if you are I hope this post helps! I think these products are perfect and affordable for that back to school make up look! If you have a Boots shop near you check out the Rimmel range they usually have a 3 for 2 offer on their products! Bargain!


When I do my make up I rarely use a primer, I just find that my foundation lasts quite well without it. I feel that this is because my skin is quite dry and tends to cling to my foundation well without primer. However if I have an occasion and I need my foundation to last I may apply a little primer on my nose as I have larger pores there which can eventually become apparent after a long day of wearing a full face of make up. I remember been a teenager and my T-zone would get quite oily especially around the apple of my cheeks. I would recommend this primer to help prevent your skin becoming oily through out the day. Its affordable for you Dolls too. I always apply primer with my clean hands as this helps work primer into the skin smoothing out your pores. Try to use a a dabbing technique when applying primer opposed to a rubbing technique as it maximises the benefits associated with your primer. Funnily enough if you apply too much primer to your face it will act the opposite to the way you want, it will end up making your foundation slip off!!


I remember those early school mornings especially in Winter I used to be ooh so comfortable in my bed! Its so hard to get up I only ever had fifteen minutes max to literally put my face on! At that time the essentials for me where to apply my foundation and to conceal my eye bags. Back then I used to apply my foundation with these awful sponges! The thought gives me chills If you have a few spare euro I really recommend that you invest your money in a few brushes. I use the Real Techniques Miracle Complexion Sponge ( make sure you wet it before using! ) for both my foundation and concealer I literally bounce it all over my face. Please remember to blend your foundation down your neck a little to avoid any obvious make up lines. Also your skin is so beautiful when your young; soft, ceaseless and glowing so use both these products sparingly tp avoid your make up looking like a mask! 


I know a lot of you Dolls do not powder your skin and that is completely up to you, after all the dewy skin look is still on trend! But for me I like to set my whole face in powder to keep it from moving around throughout the day. I do not apply layers of powder just enough to take that tacky feel off of my skin. I use a large fluffy powder brush to do this. Make sure you set the foundation on your neck to avoid transference of product onto your blouse. 


For me I always struggle in a hurry to create a good brow, and I am sure you will be rushing so much in the morning that you will love this quick and easy product. All you have to do is comb this product threw your brows and it effortlessly gives your brows a tint, structure and an over all groomed look!! Winning! :) 


Almost done now! You probably only have a few minutes left to spare now...
I like to also add volume to my lashes I love this W7 mascara! With a quick flick of your wand you have quickly and easily enhanced your eyes! Hopefully this will make you look more awake too!


To complete this look I added a dab of blush, I used the middle blush from this Sleek compact. It has finely milled sparkles in it that add both a pop of colour to your face and a glow.


To finish off this look I added a layer of Tiramisu by Nyx  for a nude glossy lip! I lost the photo I had of this Lippy but its well worth investing in and it smells devine! 


Thanks Dolls for reading! I hope this will be a quick and easy look for you to use for going back to school! All these products are Drug store and are affordable!

If you have any questions leave them in the comment section.
Thank you ♡

Lots of Love Eleanor xx